
Large scale sitting rabbit for Easter and Springtime decorating fun.
(This project has a difficulty level of intermediate to advanced.)
PLEASE NOTE: PARTS 1 & 2 FILES REQUIRED!

Measures approx. 17” tall from top of head to feet (plus 6” ears)
x 6” wide at hips x
4.5” front to back.
Components are built as separate boxes
that are assembled by threading ribbon or twine
through the channel posts in in each,
then securing each joint with a button on each side.
Details include dimensional tail with scalloped
“fur” circles,
tummy oval, hand and feet paws, teeth and shaped cheeks,
eyes
and inner ears. Neck post "spacing"
provides a place to tie a decorative ribbon.

A. Body, arms, upper legs, lower legs and feet are built separately as "simple" boxes. Those that are "closed" boxes will have openings to provide construction "finger" access, which are covered with "trap door" panels as their final assembly step. Head is constructed as a complex box with attached dimensional nose, ears with base platform, shaped cheeks, etc.
B. Boxes are assembled by folding tabs and sections on perforation lines, then bringing corresponding straight edges to overlap tabs to perf lines and attaching. Accuracy is important at every joining step in order to ensure that parts fit together. Some of the fittings are "snug".
C. Button and ribbon "joints" connect the rabbit's components. A certain tension is required between buttons. To withstand this tension, square "post" tubes are formed and inserted through corresponding square holes in shapes, with end tabs folded back on the exterior of the box component and glued into place. Cosmetic washer circles are glued in place over the tabs.
D. Ears are shaped with "pleating" perforations at lower end, decorative inner ear attached, then a slight curl added. End tabs in a "T" formation are inserted through ear platform, folded back and glued in place. Platform is attached to top of head.
E. Neck hexagon post is inserted through head bottom panel, then fit into corresponding opening in body top panel. The bottom of the neck post is shaped with "notched" FRONT panels to sit on and be hot-glued to the body upper post tube, with a back neck tab shape glued to neck tube and body to assist attachment.
ASSEMBLY:
1. Identify and cut the shapes:
Head and arms
 A head front
B head back
C head back trap door
D neck post (file shape modified)
E nose "box" with nose shapes
F cheek shapes
G ears (outer L & R, inner)
H eyes, whiskers, teeth
I arm main shapes with paws
J arm strips
K arm trap doors
L paw toe accents
M arm post "tunnel" tubes (2)
N tube end "washers" (20 total)
NOT SHOWN: ears panel with T slots & back neck connector tab
 O body front with tummy
P body back
Q body left and right sides
R body back trap door
S body post tubes
T tail "box", 3 decor shapes
U upper leg boxes
V lower leg boxes
W upper leg trap doors
X foot boxes, paws, toe strips
Y upper leg post tubes

HEAD ASSEMBLY:
2. Align and join head panels at the center portion of the side seam. NOTE that the final version has moved the side seam one panel to the right from what is represented in this image.

3. Prepare the nose "box" by folding tabs upward, all other perforation lines backward (mountain folds). NOTE that the bottom side tab in the final version has been eliminated.
ASSEMBLY:
1. Identify and cut the shapes:
Head and arms
B head back
C head back trap door
D neck post (file shape modified)
E nose "box" with nose shapes
F cheek shapes
G ears (outer L & R, inner)
H eyes, whiskers, teeth
I arm main shapes with paws
J arm strips
K arm trap doors
L paw toe accents
M arm post "tunnel" tubes (2)
N tube end "washers" (20 total)
NOT SHOWN: ears panel with T slots & back neck connector tab
P body back
Q body left and right sides
R body back trap door
S body post tubes
T tail "box", 3 decor shapes
U upper leg boxes
V lower leg boxes
W upper leg trap doors
X foot boxes, paws, toe strips
Y upper leg post tubes
HEAD ASSEMBLY:
2. Align and join head panels at the center portion of the side seam. NOTE that the final version has moved the side seam one panel to the right from what is represented in this image.
3. Prepare the nose "box" by folding tabs upward, all other perforation lines backward (mountain folds). NOTE that the bottom side tab in the final version has been eliminated.
Align (under-lapped) and join the triangle tabs near the top and bottom on both left and right sides to their corresponding straight edges.

4. Insert tabs into corresponding slots on front center panel of head. These are snug fits and may take patience and time to get them all inserted.

5. On head backside, fold tabs outward and glue in place.
NOTE: if the lowest side tabs extends behind the head section perforation lines, trim them back slightly.

6. Shape the head by overlapping, aligning and attaching the "pleat" seams at the top and bottom of the head.

7. Align the back panel tab perf line with the straight side back edge, adjust for top and bottom alignment, then attach.
Also complete the final "pleat" seams at top and bottom. (The upper "pleat" seam is already completed in this image.

8. Prepare the neck tube by folding upper tabs back, vertical perforations folded as "mountain" folds. (NOTE: the neck tube in the final file has a shaped front bottom edge with no lower rim tabs.)
Overlap the straight side edge with the side tab and join.

9. Insert the shaped end through the backside of the head bottom panel hex hole, slide all the way in so that the tab perf lines seat at the opening edge . . .

. . . then fold tabs outward and glue in place.

10. Fold the neck/bottom head panel into place and attach each segment of the edge to the corresponding tabs at head bottom.

11. Fold the head top panel down and attach each straight edge to corresponding tabs in a similar manner as for the bottom.

12. Prepare the left and right ears and inner ears by folding on the center perforation lines as "valley" folds. Also fold the main ear on the outer perf lines as "mountain" folds (these will form the pleat at the bottom of the ear).
13. Position and attach the inner ear with center perf lines matched, inner ear approx. 7/8" down from the top of the main ear shape. Then, before glue dries completely . . .

. . . give the ear tip some curl by using a rod-shaped tool (like this spatula handle) and rolling the paper as the tool is slid across the tip with finger pressure on the back (think curling ribbon).

14. Form the ear bottom ends into a pleat as shown by bringing the outer fold edges together.
NOTE that the bottom tab that is notched will be placed toward the center of the head.

Glue the lower 1" or so of the pleat inner edges together, and hold until secure. (This gluing may take some time to cure and secure - consider using a clip such as a folio or bull-nose clip until completely dried.)

15. The bottom tabs will eventually be folded into final position as shown, i.e. front tabs folded outward/forward, and back double-thick tab folded toward the center of the ears panel.
However, it may be easier to insert the tab ends into the T slot while they are NOT folded. Therefore, leave the slots straight up in their "T" formation for step 16.

16. Insert ear end into corresponding T slot on the ears panel. (front of ear will face toward the top bar of the T). Slide the ear in until panel edge lines up with the tabs perf lines.

17. On the underside of the panel, fold the double-thick back tab toward center, front tabs forward. and glue securely in place.
18. Repeat the process to insert and connect the second ear in the other T slot.

19. Apply adhesive to the bottom of the ears panel, place over the top panel of the head assembly and hold in place until completely secure. (Use trap door opening to apply finger pressure from the inside of the head.)

Layer the nose shapes.
Layer the teeth shapes (two full length and one bottom half shape for simple dimension; bottom partial shape upper edge will assist in positioning at head crest line).

21. Prepare the dimensional cheek left and right shapes by creasing on the perforation lines. Fold into shape to bring the straight edge to overlap the tab perf line and glue in place.

Add a couple of small foam dimension squares to the backside of the "side" panels (on the tab-connected section and the section above that) near the intersections at the center.

22. Attach the nose on the bottom center triangle of the nose box.
Attach the teeth right below the nose decor shape.
Position and attach the cheek shapes so that the straight extension edge at center aligns right under the nose. NOTE that the extension tips of both shapes will meet at the center.

Position and attach whiskers and eyes.
 ARM ASSEMBLY:
23. Prepare the main arm shape by folding on back edge perforations, on tabs and horizontal perf lines.
ARM ASSEMBLY:
23. Prepare the main arm shape by folding on back edge perforations, on tabs and horizontal perf lines.
Fold the boxing strip into position at the arm upper "curve" to bring the angled straight edges to align with tabs, adjust, then glue each edge segment to corresponding tabs.
NOTE as shown here, it may be helpful to keep the front long rectangle portion of the strip extended up and out of the way as the shorter tabs and edges are joined.
Position and join the rectangle end in place.

24. Align and join the opposite side tabs and edges.
25. Prepare and attach the lower front arm boxing strip end tab (NOTE there are small circle symbols in tabs at/near strip ends that will be joined for reference.)

25. Continue to position, align and attach edges to boxing tabs until the both edges of the lower section are joined,

26. Prepare the arm (and leg) tunnel posts by folding on long perforations - leave end tabs unfolded at this point.
Roll the shape into a square tube, overlap long straight edge to long tab perforation line and hold until joint is secure.
NOTE it may be helpful to insert a narrow rod tool like a knitting needle into the tube to provide a pressure resist surface as the seam is glued.

27. Insert the post end through the opening on one side then through . . .

the opposite side opening, using the trap door opening to assist.

Fold the tabs back and glue in place on both sides of the arm.

Position and glue a "washer" cosmetic shape over the tabs.

28. Position and glue the matched-size trap door panels in place to cover the finger openings.

BODY ASSEMBLY
29. Prepare front and back body sections by folding on horizontal perforation lines.
Join the two sections by overlapping the front bottom straight edge at back bottom tab perf line, adjust and attach.

30. Begin to join the first side body section by aligning straight edge and tab perf near top, adjusting and attaching.

31. Continue to bend the front to align with the tab edges of the side, to join all of tabs and edges.

32. Repeat for the other side.

33. Prepare the upper (shorter) and lower tunnel tubes.
Insert into corresponding side body opening (top shown here) and across through the opposite opening. Fold and attach tabs, cover with cosmetic circles as for the arm assembly.

34. Fold the top panel into place and attach.

35. Prepare the tail "box" by folding on perforation lines, then folding flange edges to align at wedge tabs and gluing each of the six in place.

NOTE that one of the tabs has a curved edge. This tab will need to be positioned at the bottom when the tail is inserted into the back panel.

36. Position the middle-sized scallop tail circle onto the tail box by sliding the tabs into the opening from the face/top side. Slide it up to it's final, snug halfway position.

37. Position and attach the largest scallop tail circle on the face of the back trap door panel, with 5 hex opening edges lined up.
38. Insert the tail box assembly, tabs first, into the hex opening, then . . .

. . . fold tabs back and glue in place.

39. Position and attach the top tail scalloped circle (with fur tabs bent upward slightly) onto the top of the tail box.
Match, if you can, the half-scallop "offset" that exists between the bottom two scallop edges (i.e., center top of one scallop aligned at valley of larger ring).
 (NOTE: if you wish, prepare a packet of doll ballast pellets, beans, etc. and insert into the bottom body at this point.)
40. Position and attach the back trapdoor/tail panel.

41. Fold the tummy decor shape slightly on the perf lines, then position (center) and attach to the body front.
 LEGS ASSEMBLY
42. Assemble the upper leg boxes in a manner similar to the arm box (leg box has two "rounded" ends).

43. Prepare and insert two tunnel posts in leg openings, including the circle washers.

44. Position and attach the trap door panel.

45. Prepare the lower leg "box" (actually has open ends and is a tube) by bringing side edge to perf line and attaching.
Prepare, insert and attach tunnel tube at the lower square opening.

46. Prepare the foot box by folding on perforation lines and aligning edges and tab perf lines as shown here.
Attach corresponding edges and tabs.

47. Layer lower (long) paw and contrast base shapes, then position on the bottom of the foot box.
Position and attach toe separation strip accent shapes on the lower and upper front sections so that they roughly line up with the divisions between the toe circle cutouts on the paw dec shape.
NOTE: Prepare the arm paw decorative shapes and toe separation strips and attach in similar manner to the arms, with paws being placed on the inner surface of each arm to create a left and a right arm.

48. Insert the lower leg square end into the top of the foot shape (snug fit) and . . .

. . . make sure that the leg is fully inserted down and back so that the foot circle opening lines up with the tunnel post opening.


FINAL ASSEMBLY: BUTTON JOINTS
49. Button joints consist of a pair of buttons with attached ribbon threaded through the tunnel tube to connected on each side of boxes being joined.
Demonstration here is for the leg joint.
Insert upper leg front end between the struts at top of lower leg. (NOTE front end has more length between tunnel and top of curve.)
Thread a 12" length of ribbon (model uses 1/8" sheer) through both button holes, ends pulled even.
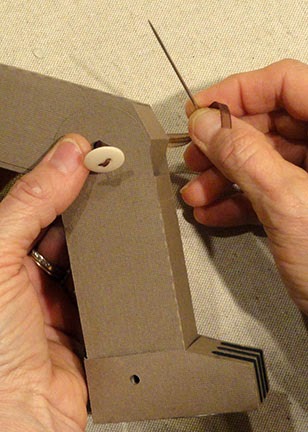
50. Re-thread both ribbon ends onto long needle,
pass needle through tunnel from the inside
(trap door side) . . .

. . . out the other end (outside leg surface). Re-thread each ribbon end separately and pass through individual button holes. Tie knot and snug the joint together as necessary, then tie bow. Trim ends, secure bow with dab of glue.
Foot joint: attach buttons with ribbon in identical fashion.
 Hip joint: Attach a 12" or so length of ribbon pair, each through a button hole of button #1, tie knot and bow. Thread both ends onto long (doll) needle, insert through first leg, lower body and second leg tunnels, then thread ribbon ends individual through holes of button #2.

Tie knot and bow and apply glue as for leg joint.
Arms Joint: Attach in similar fashion to hip joint.

51. Test fit the neck post into the body top opening, then remove. Apply hot glue puddles or bead along top surface of upper body tunnel post, then quickly re-insert neck post, seat properly the neck post cutout onto the tunnel post. Adjust as necessary, then hold in place until glue cools and firms.

52. Fold the back neck connector tab in chair shape, then apply glue and position to attach top portion to neck post back face, middle portion to body top, lower portion to body back. Hold in place until secure.

FINISHING TOUCH:
Carefully wrap and tie a length of colorful ribbon around the exposed neck post.

4. Insert tabs into corresponding slots on front center panel of head. These are snug fits and may take patience and time to get them all inserted.
5. On head backside, fold tabs outward and glue in place.
NOTE: if the lowest side tabs extends behind the head section perforation lines, trim them back slightly.
6. Shape the head by overlapping, aligning and attaching the "pleat" seams at the top and bottom of the head.
7. Align the back panel tab perf line with the straight side back edge, adjust for top and bottom alignment, then attach.
Also complete the final "pleat" seams at top and bottom. (The upper "pleat" seam is already completed in this image.
8. Prepare the neck tube by folding upper tabs back, vertical perforations folded as "mountain" folds. (NOTE: the neck tube in the final file has a shaped front bottom edge with no lower rim tabs.)
Overlap the straight side edge with the side tab and join.
9. Insert the shaped end through the backside of the head bottom panel hex hole, slide all the way in so that the tab perf lines seat at the opening edge . . .
. . . then fold tabs outward and glue in place.
10. Fold the neck/bottom head panel into place and attach each segment of the edge to the corresponding tabs at head bottom.
11. Fold the head top panel down and attach each straight edge to corresponding tabs in a similar manner as for the bottom.
12. Prepare the left and right ears and inner ears by folding on the center perforation lines as "valley" folds. Also fold the main ear on the outer perf lines as "mountain" folds (these will form the pleat at the bottom of the ear).
13. Position and attach the inner ear with center perf lines matched, inner ear approx. 7/8" down from the top of the main ear shape. Then, before glue dries completely . . .
. . . give the ear tip some curl by using a rod-shaped tool (like this spatula handle) and rolling the paper as the tool is slid across the tip with finger pressure on the back (think curling ribbon).
14. Form the ear bottom ends into a pleat as shown by bringing the outer fold edges together.
NOTE that the bottom tab that is notched will be placed toward the center of the head.
Glue the lower 1" or so of the pleat inner edges together, and hold until secure. (This gluing may take some time to cure and secure - consider using a clip such as a folio or bull-nose clip until completely dried.)
15. The bottom tabs will eventually be folded into final position as shown, i.e. front tabs folded outward/forward, and back double-thick tab folded toward the center of the ears panel.
However, it may be easier to insert the tab ends into the T slot while they are NOT folded. Therefore, leave the slots straight up in their "T" formation for step 16.
16. Insert ear end into corresponding T slot on the ears panel. (front of ear will face toward the top bar of the T). Slide the ear in until panel edge lines up with the tabs perf lines.
17. On the underside of the panel, fold the double-thick back tab toward center, front tabs forward. and glue securely in place.
18. Repeat the process to insert and connect the second ear in the other T slot.
19. Apply adhesive to the bottom of the ears panel, place over the top panel of the head assembly and hold in place until completely secure. (Use trap door opening to apply finger pressure from the inside of the head.)
(This is starting to get fun!)
20. Prepare the face features. Bend the eye "socket" shapes on the perf lines. Attach pupil circles and transfer the fold by creasing the layered shape.
Layer the nose shapes.
Layer the teeth shapes (two full length and one bottom half shape for simple dimension; bottom partial shape upper edge will assist in positioning at head crest line).
21. Prepare the dimensional cheek left and right shapes by creasing on the perforation lines. Fold into shape to bring the straight edge to overlap the tab perf line and glue in place.
Add a couple of small foam dimension squares to the backside of the "side" panels (on the tab-connected section and the section above that) near the intersections at the center.
22. Attach the nose on the bottom center triangle of the nose box.
Attach the teeth right below the nose decor shape.
Position and attach the cheek shapes so that the straight extension edge at center aligns right under the nose. NOTE that the extension tips of both shapes will meet at the center.
Position and attach whiskers and eyes.
ARM ASSEMBLY:Fold the boxing strip into position at the arm upper "curve" to bring the angled straight edges to align with tabs, adjust, then glue each edge segment to corresponding tabs.
NOTE as shown here, it may be helpful to keep the front long rectangle portion of the strip extended up and out of the way as the shorter tabs and edges are joined.
Position and join the rectangle end in place.
24. Align and join the opposite side tabs and edges.
25. Prepare and attach the lower front arm boxing strip end tab (NOTE there are small circle symbols in tabs at/near strip ends that will be joined for reference.)
25. Continue to position, align and attach edges to boxing tabs until the both edges of the lower section are joined,
26. Prepare the arm (and leg) tunnel posts by folding on long perforations - leave end tabs unfolded at this point.
Roll the shape into a square tube, overlap long straight edge to long tab perforation line and hold until joint is secure.
NOTE it may be helpful to insert a narrow rod tool like a knitting needle into the tube to provide a pressure resist surface as the seam is glued.
27. Insert the post end through the opening on one side then through . . .
the opposite side opening, using the trap door opening to assist.
Fold the tabs back and glue in place on both sides of the arm.
Position and glue a "washer" cosmetic shape over the tabs.
28. Position and glue the matched-size trap door panels in place to cover the finger openings.
BODY ASSEMBLY
29. Prepare front and back body sections by folding on horizontal perforation lines.
Join the two sections by overlapping the front bottom straight edge at back bottom tab perf line, adjust and attach.
30. Begin to join the first side body section by aligning straight edge and tab perf near top, adjusting and attaching.
31. Continue to bend the front to align with the tab edges of the side, to join all of tabs and edges.
32. Repeat for the other side.
33. Prepare the upper (shorter) and lower tunnel tubes.
Insert into corresponding side body opening (top shown here) and across through the opposite opening. Fold and attach tabs, cover with cosmetic circles as for the arm assembly.
34. Fold the top panel into place and attach.
35. Prepare the tail "box" by folding on perforation lines, then folding flange edges to align at wedge tabs and gluing each of the six in place.
NOTE that one of the tabs has a curved edge. This tab will need to be positioned at the bottom when the tail is inserted into the back panel.
36. Position the middle-sized scallop tail circle onto the tail box by sliding the tabs into the opening from the face/top side. Slide it up to it's final, snug halfway position.
37. Position and attach the largest scallop tail circle on the face of the back trap door panel, with 5 hex opening edges lined up.
38. Insert the tail box assembly, tabs first, into the hex opening, then . . .
. . . fold tabs back and glue in place.
39. Position and attach the top tail scalloped circle (with fur tabs bent upward slightly) onto the top of the tail box.
Match, if you can, the half-scallop "offset" that exists between the bottom two scallop edges (i.e., center top of one scallop aligned at valley of larger ring).
40. Position and attach the back trapdoor/tail panel.
41. Fold the tummy decor shape slightly on the perf lines, then position (center) and attach to the body front.
42. Assemble the upper leg boxes in a manner similar to the arm box (leg box has two "rounded" ends).
43. Prepare and insert two tunnel posts in leg openings, including the circle washers.
44. Position and attach the trap door panel.
45. Prepare the lower leg "box" (actually has open ends and is a tube) by bringing side edge to perf line and attaching.
Prepare, insert and attach tunnel tube at the lower square opening.
46. Prepare the foot box by folding on perforation lines and aligning edges and tab perf lines as shown here.
Attach corresponding edges and tabs.
47. Layer lower (long) paw and contrast base shapes, then position on the bottom of the foot box.
Position and attach toe separation strip accent shapes on the lower and upper front sections so that they roughly line up with the divisions between the toe circle cutouts on the paw dec shape.
NOTE: Prepare the arm paw decorative shapes and toe separation strips and attach in similar manner to the arms, with paws being placed on the inner surface of each arm to create a left and a right arm.
48. Insert the lower leg square end into the top of the foot shape (snug fit) and . . .
. . . make sure that the leg is fully inserted down and back so that the foot circle opening lines up with the tunnel post opening.
FINAL ASSEMBLY: BUTTON JOINTS
49. Button joints consist of a pair of buttons with attached ribbon threaded through the tunnel tube to connected on each side of boxes being joined.
Demonstration here is for the leg joint.
Insert upper leg front end between the struts at top of lower leg. (NOTE front end has more length between tunnel and top of curve.)
Thread a 12" length of ribbon (model uses 1/8" sheer) through both button holes, ends pulled even.
50. Re-thread both ribbon ends onto long needle,
pass needle through tunnel from the inside
(trap door side) . . .
. . . out the other end (outside leg surface). Re-thread each ribbon end separately and pass through individual button holes. Tie knot and snug the joint together as necessary, then tie bow. Trim ends, secure bow with dab of glue.
Foot joint: attach buttons with ribbon in identical fashion.
Tie knot and bow and apply glue as for leg joint.
Arms Joint: Attach in similar fashion to hip joint.
51. Test fit the neck post into the body top opening, then remove. Apply hot glue puddles or bead along top surface of upper body tunnel post, then quickly re-insert neck post, seat properly the neck post cutout onto the tunnel post. Adjust as necessary, then hold in place until glue cools and firms.
52. Fold the back neck connector tab in chair shape, then apply glue and position to attach top portion to neck post back face, middle portion to body top, lower portion to body back. Hold in place until secure.
FINISHING TOUCH:
Carefully wrap and tie a length of colorful ribbon around the exposed neck post.
And (finally) construction is complete!
(Fifty-two steps - whew!!)
I love it!! Amazing!
ReplyDeleteI love that bunny!
ReplyDeleteHi, Loving this bunny... what files were used to make this and where can i buy the files?
ReplyDeleteThe files are available right now from SnapDragonSnippets.com and from Silhouette America's online store. It takes TWO files (large and complicated design with many shapes). Title is Rabbit 3d button jointed. Hope you can connect up. Here is the link to SnapDragon https://www.snapdragonsnippets.com/store/product/958.
ReplyDeleteHello, I think this is soo cute. I purchased it from Silhouette. Nothing is going together good. Can I send you email with some pictures?
ReplyDeleteJulie
I just made it and it's lovely, quite a puzzle but I did it. Thank you
ReplyDelete